ISOLATION
PERSONNEL
Below are the listed CHARACTERS within the game, despite some of these characters being horrors, they are employed by AZTEK which means they'll be listed here.
Research Department
Dr. SullivanOutlet Department
Clement
TEETH
Knowles
Bino CassinaAi Units
Ceres
Aaisu
Snake
8-Bit
IronClaw
Security
HORRORS
Within ISOLATION, there are currently four categories of HORRORs. Each horror has its own unique traits, as well as THREAT LEVEL.
THREAT LEVELs are categorized into four parts.X1 : These entities are passive, they are not significant.
X2 : These entities react neutrally, tread with caution. Can be avoided, but upon provoking may react aggressively.
X3 : These entities are extremely hostile and aggressive, do your best to avoid them.
X0 : Unknown data. Unpredictable.
GAMMA HORRORS
GAMMA HORRORS are environmental entities. Most of the time, they are classified as an X1 threat level. They will never exceed an X2 threat level. Below are the current Gamma's in the game, or planned to be added at a later date:
Cosmoses Sickness
The Flesh
The Flesh Rooms
Gas Leaks
The Gardens
DELTA HORRORS
DELTA HORRORS are roaming entities. These entities are classified between X1-X3, very rarely however, you may encounter an X0 delta horror. Below are the current Delta's in the game, or planned to be added at a later date:
The Mimic
Night Dwellers
Sunshine
Wings
Ears
Nerves
Hands
Viperworms
Crawlers
Sleepers
The Rat
The Null
The Root
The Benevolence
Sack-Girl
The Burrow
Saprophytes
EPSILON HORRORS
EPSILON HORRORS are bosses. These entities are significantly more dangerous than other entities you've encountered, and are always going to be a threat level X3. Epsilons are avoidable, however if you find yourself trapped with one there are ways to suspend it. Below are the current Epsilon's in the game, or planned to be added at a later date:
The Face of Heaven
The Siren
The Amalgamation
The Sick & Twisted
IOTA HORRORS
IOTA HORRORS are titan class entities. There is not a lot of data on iota entities. All iota's are classified as X0 threat levels.If you see one, it's already over.Below are the current Iota's in the game, or planned to be added at a later date:
The All Seeing
The Leviathan
The Giant [DECEASED]
SECTORS & EXPANSES
SECTORS are different levels within the facility where you'll find different EXPANSES. Each expanse has a different function within the facility, but have since been labeled quarantine zones due to the UPSILON-EVENT. Each sector has it's own unique set of rooms to explore as well as monsters to encounter.
THE PROVINCE
[THE BEGUILE]
[THE HOLLOWS]
[THE MARIANA DEPTHS]
[DEAD ZONE]
[THE FISSURE]
THE PROVINCE
THE PROVINCE is ground zero, it's the very first level of the facility usually housing offices, facility equipment; and is found closest to the surface. The oxygen on these levels is usually never an issue, and you will not have to worry about contamination.
The Drop-Off
[The Offices]
[Storage Units]
[The Surface]
[The Corridors]
[The Viper Rooms]
[Ventilation]
ITEMS
ITEMS are useful tools to help you throughout your runs. You can upgrade items, as well as apply up to 2 modifiers to them.
E.M.U. Suit
Flashlights
Lighters
Heat Sensors
Motion Sensors
Noise Makers
Stun Stick
Flamethrower
Extravehicular Mobility Unit suits are vital for exploring the quarantine zones, as they allow you to manage your oxygen and contamination levels. Equipped with a unique AI to warn you of your levels if they're too low. The E.M.U. suit also has upgradeability, allowing you to apply modifiers to enhance it's preformance.
Available modifiers
Vitality - Allows you to replenish oxygen over-time instead of needing oxygen-tanks.
Pressure Lock - Allows you to go deeper than 100 meters in water-locations without needing an external device


Concept Art

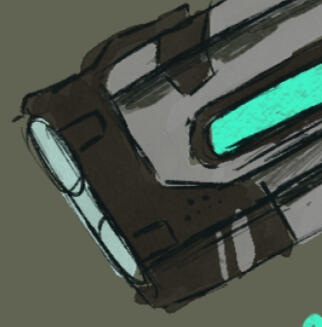
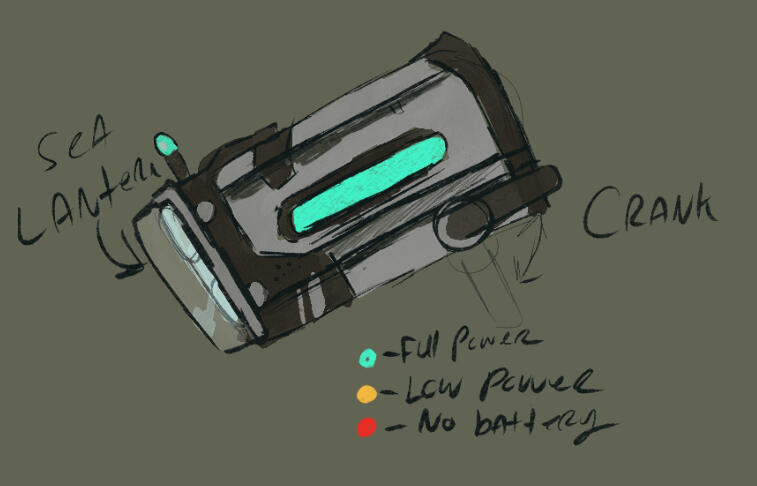
Flashlights are useful tools to help you in the dark. Be careful though, light can attract things. In order to recharge your flashlight, you'll have to find a battery out in the open. Upgrade your flashlight to be able to hold multiple batteries at once.
Available modifiers
Crank - recharge your flashlight by cranking it. light battery dies faster.
Sea Lantern - use your flashlight under water
Available workshop upgrades
Carry T1 - C$50
Carry up to three batteries.
Carry T2 - C$50
Carry up to six batteries.

Concept Art
Untitled


Lighters are a useful light source, yet much weaker than a flashlight. It's light range is limited, and runs out of fuel rather quickly. However, lighters are very useful if you achieve the fuel modifier, which allows you to create a make-shift flamethrower.
Available modifiers
Firestarter - allows you to use concentrated flammable gas with a lighter, allowing you to make a make-shift flamethrower.

Concept Art

Heat sensors allow you to read the heat signature of your current environment. It only reads the current room you are in, allowing you to see entities that are otherwise hidden. Some entities will not appear on the motion sensor due to their stillness, which is where the heat sensor may save you. You cannot use this device in water.
Available workshop upgrades
Cool down T1 - C$50
60 second cool down > 30 second cool downCool down T2 - C$100
30 second cool down > 15 second cool down

Motion sensors are useful for avoiding dangerous entities in the quarantine zone. It allows you to detect movement within radius, be it your teammates, or horrors.
Available modifiers
XRAY - allows you to pin-point items.
Waterproof - allows you to use the device under water
Available workshop upgrades
Cool down T1 - C$50
60 second cool down > 30 second cool downCool down T2 - C$100
30 second cool down > 15 second cool downRadius T1 - C$50
1 room > 2 rooms

A throwable item that allows you to distract nearby entities. The noise will draw them in, while you have an opportunity to escape. Although... not every entity can be fooled by a mere distraction.

A very good item to have on you while completing your tasks. With this, you can stun most entities for a short period of time, allowing you a quick escape. Very useful to have if an entity is blocking the path you need to go down, be careful though, it doesn't hold them forever. Some entities may be stun resilient.
Available modifiers
Recharge - allows you to use a stun in order to recharge your electronic devices.
Rabbit's Foot - gives you a small speed boost upon stunning an entity
Available workshop upgrades
Cool down T1 - C$100
120 second cool down > 100 second cool downCool down T2 - C$120
100 second cool down > 80 second cool downCool down T3 - C$150
80 second cool down > 50 second cool downParalysis T1 - C$100
Stun lasts 7 seconds > 10 secondsParalysis T2 - C$120
Stun lasts 10 seconds > 12 seconds

Acquirable only after you've gained the firestarter modifier for lighters. Flamethrowers are handy, while you can't kill an entity with it, you can scare most off with it. Some environments require flames to burn through foliage, allowing you to continue forward on an easier path. Fuel runs out fast, you can find fuel tanks around the quarantine zone.
Available workshop upgrades
Lasting fuel T1 - C$150
Fuel lasts 20% longerLasting fuel T2 - C$200
Fuel lasts 30% longer
